Rokasgrāmata Electrolux PD91-6IWX Putekļu sūcējs

Nepieciešama rokasgrāmata savam Electrolux PD91-6IWX Putekļu sūcējs? Zemāk var apskatīt un bez maksas lejupielādēt PDF rokasgrāmatu latviešu valodā. Šim produktam pašlaik ir 10 bieži uzdotie jautājumi, 0 komentāri un 0 balsis. Ja šī nav jūsu vēlamā rokasgrāmata, lūdzu, sazinieties ar mums.

Vai jūsu produkts ir bojāts, un rokasgrāmatā nav sniegts risinājums? Dodieties uz Repair Café, lai veiktu bezmaksas remontu.

Rokasgrāmata

1 32 4
2www.electrolux.com
13 14
17
16 18
5 876
9
1211
2625
19 20
22
21
15
10
23
24
3www.electrolux.com
ENGLISH
Thank you for choosing Electrolux PURED9 vacuum cleaner. Always
use original accessories and spare parts to get the best results. This
product is designed with the environment in mind. All plastic parts are
marked for recycling purposes.
BEFORE STARTING
• Read this manual carefully.
• Check that all parts described are included.
• Pay special attention to the safety precautions!
DESCRIPTION OF PURED9 VACUUM CLEANER
A. Display (see versions later)
B. Exhaust lter lid
C. Exhaust lter
D. Parking slots
E. Power cord
F. Motor lter
G. Motor lter holder
H. S-bag®
I. S-bag® holder
J. Dust compartment cover
K. AeroPro 3in1 tool
L. AeroPro hose
M. AeroPro handle (see versions
later)
N. AeroPro telescopic tube
O. Parking clip
P. Display for models with rotary
knob manual control*
Q. Display for models with remote
control*
R. Display for models with remote
control and AUTO function*
S. AeroPro Classic handle*
T. AeroPro Ergo handle*
U. AeroPro Remote Control
handle*
V. AeroPro FlowMotion nozzle*
W. AeroPro PureVision nozzle
(with front lights)*
X. AeroPro Turbo nozzle*
Y. AeroPro Mini Turbo nozzle*
Z. ParkettoPro nozzle*
AA. AeroPro FlexProPlus nozzle*
AB. AeroPro Long crevice nozzle*
* Certain models only
HOW TO USE THE VACUUM CLEANER
1 Open the dust compartment cover by pulling the S-BAG button. Check
that the dust bag (s-bag) is in place.
2 Insert the hose into the cleaner (to remove it, press the lock buttons
and pull). Insert the hose into the hose handle until the lock button
clicks (to release it, press the lock button
and pull).
3 Attach the telescopic tube to the nozzle. Attach the telescopic tube to
the hose handle (to remove it, press the lock button and pull).
4 Adjust the telescopic tube by holding the lock with one hand and
pulling the handle with the other hand.
START/STOP THE VACUUM CLEANER AND ADJUST SUCTION POWER
5 Pull out the power cord and plug it into the mains. Press the ON/
OFF button to turn the cleaner on/o. Indicators light up, MIN/MAX
indicator lights up from left to right and back (auto function models).*
Models with remote control can also be operated by the ON/OFF
button on the handle.*
6 Adjust suction power (manual control models): Turn the rotary knob on
the cleaner or use the air valve on the handle.*
7 Adjust suction power (remote control models): Press +/- button on the
handle. MIN/MAX and symbols indicators on display will show level of
power.*
8 Adjust suction power (remote control models with AUTO): The cleaner
starts in AUTO mode (automatic power regulation). AUTO indicator is
illuminated on the display and MIN/MAX indicator pulses. To regulate
power manually press +/- button on handle. Press AUTO button to
return to auto-function.*
9 After cleaning, push the REWIND button to rewind the cable.
PARKING POSITIONS
10 Use parking position on the side (A) or underneath (C) to carry and
store the cleaner. At the back (B) when you pause (save your back).
REPLACING THE DUSTBAG, SBA
11 Replace the s-bag when
- P* Models with rotary knob: S-BAG indicator lights up in red
- Q* Models with remote control: S-BAG symbol lights up red.
- R* Models with remote control and AUTO: S-BAG indicator lights up
in red (green light: bag is OK, yellow light: soon time to replace bag).
NB: Always change the s-bag when S-BAG indicator is illuminated or
has red light even if the s-bag is not full (it may be blocked) and after
using carpet cleaning powder. For best possible performance, use the
Ultra Long Performance bag which is especially developed for your
cleaner. Other synthetic s-bags can also be used. Do not use paper dust
bags! www.s-bag.com
12 Pull the S-BAG button to open the dust compartment. The handle of
the s-bag holder goes up. Pull the handle to remove the s-bag with
holder. Do not press the release button.
13 Hold the s-bag with holder over a dust bin. Press the button to release
the s-bag. Insert a new s-bag to the holder by inserting the cardboard
at the back of the holder.
14 Insert the s-bag with holder by pushing it straight down in its tracks.
Make sure the s-bag is not stuck under the holder. Close the lid. If the
s-bag is not properly placed or is missing, the lid will not close.
NB: When you start the cleaner after s-bag replacement, It takes 10
seconds before the S-BAG indicator turns o (P* Models with rotary
knob and Q* Models with remote control) or turns green (R* Models
with remote control and AUTO).
REPLACING THE FILTERS
15 Replace/clean** the lter when (**washable lter only)
- P* Models with rotary knob: you have changed the s-bag 5 times
- Q* Models with remote control: FILTER symbol lights up in red
- R* Models with remote control and AUTO: lter indicator lights up
in red. Green light indicates that the lter is ok. It lights up briey when
you start the vacuum cleaner.
16 Pull the FILTER button to open the lter lid. Use original s-lters.
Remove the lter and check the reference on the frame to dene type.
Replace with a new lter or clean it**. Rinse the inside (dirty side) in
lukewarm tap water. Tap the lter frame to remove the water. Repeat
the process four times. (*
*washable lter only)
NB: Do not use cleaning agents. Avoid touching the lter surface.
Let the lter dry completely (min. 24 h in room temperature) before
putting back ! Change the washable lter at least once a year or when it
is very dirty or damaged. Do not remove the L-shaped foam under the
lter.
17 After replacing the lter, close the lter lid until it is clicked back into
place. If the lter lid comes o, position the hinges at the bottom and
push the lter lid until it is clicked back into place.
NB: When you start the cleaner after lter replacement, It takes 10
seconds before the FILTER indicator turns green (models with remote
control and AUTO function) or turns o (remote control models).*
18 Replace the motor lter when dirty or after every 5th s-bag. Push the
lter holder down and pull it out. Exchange the lter and close the lid.
VACUUMING WITH THE UNIVERSAL NOZZLE V*, W*
19 Change nozzle setting with the pedal. Icon illustrates recommended
oor type.
20 PureVision nozzle*: Move the nozzle forward. The front light turns on
automatically after a few seconds. When the nozzle is not used, the
light turns o automatically after a few seconds.
CLEANING THE UNIVERSAL NOZZLE V*, W**
21 Disconnect the nozzle from the tube. Clean with the hose handle.
CLEANING THE TURBO NOZZLE X*
22 Disconnect the nozzle from the tube and remove entangled threads etc
by snipping them away with scissors. Use the hose handle to clean the
nozzle. *
3IN1 ACCESSORY TOOL
23 Pull the textile tab to take out 3in1 tool. The tool has 3functions, see
pictures on next page.
24 After usage, put it back in its place.
2www.electrolux.com
GB
FR
AR
BG
GR
NO
CZ
HR
PL
DE
HU
PT
DK
IT
RO
EE
LT
RU
ES
LV
SE
SL
FI
NL
SK
SR
TR
UA
Lejupielādēt rokasgrāmatu latviešu valodā (PDF, 6.04 MB)
(Apsveriet ietekmi uz vidi un drukājiet šo rokasgrāmatu tikai tad, ja tas patiešām ir nepieciešami)

Vērtējums

Paziņojiet mums, ko jūs domājat par Electrolux PD91-6IWX Putekļu sūcējs, novērtējot produktu. Vai vēlaties dalīties pieredzē ar šo produktu vai uzdot jautājumu? Ievadiet savu komentāru lapas apakšdaļā.
Vai esat apmierināts ar Electrolux PD91-6IWX Putekļu sūcējs?
Novērtējiet šo produktu pirmais
0 vērtējumi

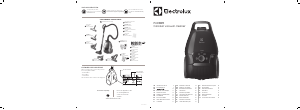
Pievienoties sarunai par šo produktu

Šeit varat dalīties savās domās par Electrolux PD91-6IWX Putekļu sūcējs. Ja jums ir jautājumi, vispirms rūpīgi izlasiet rokasgrāmatu. Rokasgrāmatu var pieprasīt, izmantojot mūsu saziņas veidlapu.

Vairāk par šo rokasgrāmatu

Mēs saprotam, ka ir patīkami, ka jūsu Electrolux PD91-6IWX Putekļu sūcējs ir papīra rokasgrāmata. Jūs vienmēr varat lejupielādēt rokasgrāmatu no mūsu vietnes un pats to izdrukāt. Ja vēlaties saņemt oriģinālo rokasgrāmatu, iesakām sazināties ar Electrolux. Viņi varētu nodrošināt oriģinālu rokasgrāmatu. Vai meklējat sava Electrolux PD91-6IWX Putekļu sūcējs rokasgrāmatu citā valodā? Izvēlieties vēlamo valodu mūsu mājaslapā un meklējiet modeļa numuru, lai redzētu, vai tas ir pieejams.

Specifikācijas

Zīmols Electrolux
Modelis PD91-6IWX
Kategorija Putekļu sūcēji
Faila veids PDF
Faila lielums 6.04 MB

Visas rokasgrāmatas par Electrolux Putekļu sūcēji
Citas Putekļu sūcēji rokasgrāmatas

Bieži uzdotie jautājumi par Electrolux PD91-6IWX Putekļu sūcējs

Mūsu atbalsta komanda meklē noderīgu informāciju par produktu un atbild uz bieži uzdotajiem jautājumiem. Ja atrodat ko nepareizu bieži uzdotajos jautājumos, informējiet mūs, izmantojot saziņas veidlapu.

Mana putekļsūcēja šļūtene ir aizsērējusi. Ko darīt? Apstiprināts

Atvienojiet šļūteni un apskatiet to, lai noteiktu, vai tā patiešām ir aizsērējusi. Šādā gadījumā varat paņemt garu priekšmetu, piemēram, slotas kātu, un uzmanīgi izstumt to caur šļūteni. Tas parasti noņems visus priekšmetus, kas aizsprosto šļūteni. Ja tas nepalīdzēja, sazinieties ar ražotāju.

Tas bija noderīgi (1464) Lasīt vairāk

Kādu izmēru putekļu maisiņi tur ir? Apstiprināts

Ir jāņem vērā divi izmēri. Pirmkārt, ir plāksnes izmērs ar maisa ieeju. Tas nosaka, vai putekļu maisiņš derēs noteiktam putekļu sūcējam. Tad ir somas izmērs. Pārsvarā tas ir norādīts litros un nosaka, cik daudz putekļu maisiņš var saturēt.

Tas bija noderīgi (944) Lasīt vairāk

Vēlos uzzināt savas Electrolux ierīces vecumu. Kā lai es to izdaru? Apstiprināts

Jūs varat noteikt sava produkta vecumu, izmantojot sērijas numuru. To var atrast savā ierīcē. Sērijas numura pirmā rakstzīme norāda gadu (ti, 1 = 2001), un divas rakstzīmes pēc tam norāda ražošanas nedēļu (ti, 35 = attiecīgā gada 35. nedēļa). Tātad sērijas numurs 13500016 norāda, ka iekārta ir no 2001. gada 35. nedēļas.

Tas bija noderīgi (836) Lasīt vairāk

Mana putekļsūcēja strāvas vads netiek uztīts atpakaļ ierīcē. Ko es varu darīt? Apstiprināts

Iespējams, ka auklā ir vītums vai ieloce. Dažas reizes pilnībā izritiniet vadu un roku vadībā attiniet to atpakaļ ierīcē. Ja tas neatrisina problēmu, iespējams, ir bojāts vada attīšanas mehānisms. Tādā gadījumā sazinieties ar ražotāju vai remonta servisu.

Tas bija noderīgi (658) Lasīt vairāk

Mans putekļsūcējs rada svilpojošu troksni. Ko darīt? Apstiprināts

Šo problēmu bieži izraisa pilns putekļu maisiņš vai filtrs vai atvere, kas ļauj gaisam iekļūt šļūtenē. Pārbaudiet putekļu maisu un filtru un, ja nepieciešams, nomainiet tos. Pārbaudiet, vai šļūtenē nav caurumu vai sliktu savienojumu. Ja tas neatrisina problēmu, sazinieties ar ražotāju.

Tas bija noderīgi (553) Lasīt vairāk

Kā noņemt putekļus un matus no putekļsūcēja sukas galviņas? Apstiprināts

Putekļu un matu noņemšana no putekļsūcēja birstes galvas ir veikta manuāli. Ja tas neizdodas, kā vēlaties, atlikušo netīrumu noņemšanai varat izmantot smalku ķemmi.

Tas bija noderīgi (536) Lasīt vairāk

Kādu iestatījumu uz putekļsūcēja sukas uzgaļa man vajadzētu izmantot? Apstiprināts

Gandrīz visiem putekļu sūcējiem ir galva ar regulējamu suku. Izmantojiet suku cietām virsmām, lai izvairītos no skrāpējumiem un bojājumiem. Izslēdziet paklāju un paklāju suku.

Tas bija noderīgi (420) Lasīt vairāk

Vai es varu izmantot papīra putekļu maisiņu vairāk nekā vienu reizi? Apstiprināts

Tas nav ieteicams. Maisiņa wat poras tiks piesātinātas, izraisot sūkšanas zudumu un, iespējams, motora bojājumus.

Tas bija noderīgi (287) Lasīt vairāk

Kas ir HEPA? Apstiprināts

HEPA ir saīsinājums no High-Efficiency Particulate Air. Daudziem putekļu sūcējiem ir HEPA filtrs. HEPA filtrs aizturēs vismaz 85% un ne vairāk kā 99,999995% no visām daļiņām, kuru izmērs ir 0,3 mikrometri (µm) un vairāk.

Tas bija noderīgi (260) Lasīt vairāk

Vai es varu izmantot parasto putekļu sūcēju, lai uzsūktu pelnus? Apstiprināts

Nē, tas absolūti nav iespējams. Pelni, kas šķiet atdzisuši, iekšpusē joprojām var būt silti vai pat karsti. Parasts putekļsūcējs tam nav paredzēts un var izraisīt ugunsgrēku. Arī parasto putekļsūcēju filtri ne vienmēr ir piemēroti ārkārtīgi mazu daļiņu, piemēram, pelnu, aizturēšanai. Pēc tam tas var sasniegt putekļsūcēja motoru un izraisīt bojājumus.

Tas bija noderīgi (251) Lasīt vairāk
Rokasgrāmata Electrolux PD91-6IWX Putekļu sūcējs

Saistītie produkti

Saistītās kategorijas